
- How To Tackle Jealousy In Creative Writing
- Common Submission Mistakes
- How To Stop Your Blog Becoming Boring
- The One Thing Every Successful Writer Has In Common
- How To Make Yourself Aware Of Publishing Scams
- Why Almost ALL Writers Make These Grammar Mistakes At Some Point
- 5 Tips For Authors On How To Deal With Rejection
- Top Mistakes to Avoid When Writing a Novel
- How to Avoid Common New Writer Mistakes
- 10 Mistakes New Fiction Writers Make
How To Effectively Plan Your Non-Fiction Book In 10 Days or Less
Do any of the following apply to you?
- You have a great idea for a non-fiction book but don’t know where to start
- You want to write a book but can’t focus your attention on one idea
- You have some ideas mapped out but the idea of writing a whole book is overwhelming!
I hear you. Writers come to me all the time with an awesome idea for a book, but no idea how to get it down on paper.
By following this simple guide you will have your next non-fiction book planned out and ready to write in as little as 10 days.
And the best part? This plan will make the process of writing SO much easier because you'll have a nice, easy structure to follow.
I've broken the entire process down into small steps to complete over the course of ten days. You'll focus on one step each day to prevent an overload of information.
So let's jump straight in!
Day 1: Choose Your Topic
What are you going to write about? This might sound like a pretty basic place to start. But many writers have a millions different ideas and don’t know which one to focus on.
When you are choosing your topic, there are a few things to keep in mind…
1. Don’t choose a topic just because others have made money from it.
You won’t have a passion for it and it will come across in your writing. Plus you’ll probably hate writing about it and get bored. Just because Sandra from work made money with a book on knitting patterns doesn’t mean you should write one too. Unless you love knitting, of course.
2. Think about what you have experience in.
It is always best when you have experience in the niche you are writing about. Are you a personal trainer who is brilliant at keeping people motivated? Write about that! Do you have a knack for creating beautiful organic soaps that everyone compliments you on? Write about it!
Many people don’t think that the thing they are good at is special, because they are naturally good at it. But there are a million people who aren’t as good as you who want your knowledge and are willing to pay for it.
3. Think about what you love.
Ok, so you are a coder in your day job and are pretty good at it. But holy crap do you hate doing it. Don't write a book on it!
You need to have a love for what you’re writing about too, because that love and passion is what readers will resonate with.
Your book will take weeks or months, you don’t want to write about something you’re not passionate about.
Although something to remember here is that “passion” doesn’t have to mean you’re obsessed with every aspect of your topic. It simply means that you are going to want to write about this topic every day for a few weeks, months or even years. Because that is what is going to take.
An awesome idea here is to combine what you are good at and what you love to find a niche. For example, perhaps you are passionate about gardening and you're great at time management.
You could think about writing, “5-minute a day gardening to grow your own vegetables”. Doesn’t that sounds so much more fun and interesting that “How to be a great gardener”?
By combining your love and what you are good at, you may find a niche you didn’t even think about. It will specify your message and speak much more deeply to your audience, which at the end of the day will increase your sales.
Day 1 Round-Up:
- Think about what you love and what you are good at
- Combine these to find a niche that you are excited to write for
- Write down your topic!
Day 2: Research
So you’ve got a great topic that you are excited to write about. Great! Next it’s time to do some quick research to make sure you have a market for it.
Many writers believe that there is a market for whatever they write. This just isn’t the case. You might have hit on such a niche topic that there isn’t a big enough audience to sell to. Alternatively, you might be targeting a market that just isn't going to buy a book.
Maybe you want to write a book about how broke students can stretch their money to support themselves through school. This target market probably isn’t going to be spending money on your book.
There is a quick and easy way to check this out, though. Go over to a book selling platform (Amazon is the easiest one) and do a key word search for your book. If you were going to search for your specific book, what would you type in to find it?
For example if you’ve decided to write about how to train your dog so you can enter him in shows, you’d write “dog training for shows” or “training my dog to win a show” and see what comes up.
If there are hundreds of books, then perhaps you’ve picked a niche that is too saturated for anything new. If amazon comes back telling you they have a big fat nothing on this topic, is there an audience for you? Or is there an audience that no one is catering for? This would be fantastic!
When I go to Amazon and type in “train your dog for a show”, Amazon has 2 books, both from a few years ago with just a couple of reviews. So if this was your topic, you’d need to dig a little deeper to see if there is an audience for this.
If your idea brings up a million different books already in that niche, think about narrowing your focus down. Instead of “how to make money blogging”, something like “how to make 2K a month blogging about overcoming anxiety.” The more specific the better!
Another great free tool for research is buzzsumo.com. You can simply type in your key words and it will bring up the most-searched content from the past days, weeks, months and years. This will give you a great indication of what is popular and what is missing in your niche!
Day 2 Round-Up:
- Head to Amazon to do a key-word search
- Use Buzzsumo to find the most-shared content in your niche
- Think about narrowing down your idea as much as possible
- Keep saleability and audience in mind
Day 3: Reaching Out
You’ve got your topic and your niche and you have found there is an audience for it. Now you need to reach out to that audience and ask what they want. Find out what problems they have. What are there pain points? What would make their lives easier?
It’s easy to assume that we know what our readers want, or what their biggest problem is. But you’ll be surprised with what you find!
You want to include specific issues within your book that your audience are struggling with. And the only way to find what these are is to reach out and ask.
Many writers have a fear of reaching out to their target market for fear of sounding 'salesy' or annoying. But there is no need to even mention that you are researching a book.
Join a Facebook group of your target audience and simply engage the members with a question like, “I’d love to hear about everyone’s number one issue with [BOOK TOPIC]! What do you wish you had to make your life easier with this?”
The audience will love the engagement and you’ll get loads of valuable feedback without anyone ever knowing they were part of your market research.
If you are feeling confident, you can tell the group that you are writing a book and would love their feedback on the topic.
People will be as passionate about the niche as you are and will be happy to help. This also begins to build your audience for when the book goes on sale (but marketing is a whole other topic!)
Day 3 Round-Up
- Find a Facebook group of your target audience
- Engage and find out what they would really love to read about
- Find the most common problem or pain point and plan great solutions!
Day 4: Brain Dump
You’ve spoken to your target market and you’ve got some feedback and awesome new ideas. It’s time to brain dump. Yeah, that’s exactly what it sounds like.
You're going to take every idea you've got about this book, and dump it all into a document on your computer. Or write it all down on paper if you're more old-school. I like to use Scrivener for this so I'll be using that as a reference.
Open up scrivener and literally dump every idea you have for your book into a new file. Don’t worry about spelling, grammar, making sense, or being structured. Just write it all down. No matter how irrelevant an idea seems, just chuck it in.
When you are at this point in the planning process, your brain is going to be so full with all the new and wonderful ideas that you’ll be overwhelmed.
By dumping out every idea you possibly have, you remove the worry of missing anything important, and give yourself the memory space to focus on one idea at a time.
Every time a new idea pops into your head, stick it in the BRAIN DUMP file. If inspiration strikes away from the computer, write it down and add it in later.
Have fun with this part of the process. Go crazy with ideas. You never know what will tumble out of your brain when you give yourself freedom. And remember that no one is ever going to see this file, so don’t stress over it being perfect.
Day 4 Round-Up
- Dump all of your ideas into a file for safekeeping!
- Use the method that suits you best, be it pen and paper, Google Docs or whatever else
- If you'd like to use scrivener too, you can get their awesome training program here (that's an affiliate link - I only recommend products that I use almost every day and couldn't live without!)
Day 5: The Contents Page
Now it’s time to plan a contents page! This can change down the road, so don’t stress too much about this part of the plan.
But in order to have a solid plan to begin writing, you need a basic layout. Look at your brain dump and pick out the biggest topics or themes that can act as the 'headings' for your other content.
Then think about putting these topics into a coherent and logical order. Your book should take your readers on a journey from the beginning where they have a problem, through a learning and information stage, to the end where their problem is solved.
Your contents should reflect this journey. So go ahead and plan out a draft of contents. Again, this is going to change, so don’t worry about it being perfect - we are still only planning!
Day 5 Round-Up:
- Go through your brain dump and pick out the main topics and themes
- Structure these into a coherent order that will form your contents page!
Day 6: Pick Your Favourite Bits
Look at your contents page and put each of your sections or chapters into order of preference. This might sound a little strange and you might be thinking, “Well surely I should love all of my sections?”
Short answer: No.
There are going to be sections that you are extra excited to write about because they’re your favourite parts of your topic. On the flip side, there may be sections that are integral to the book that you find a little boring.
If you are writing about building a blog and you’re starting with the physical process of building it, you might find this really boring because you know it so well. Whereas you might be really excited to write about the design process because designing is your true passion.
Put the chapters in order from your favourite chapter, to your least favourite.
Here’s a top writing secret: You don’t have to write your book in chronological order (waits for gasp). In fact, it’s best to start with the chapter that you are most excited about.
You are way more likely to just get going if you start with the fun part, and once this is done, seeing your progress will spur you on to create the not-so-fun parts.
Plan to write chapters in a love-hate sequence. Start with your favourite, move to your least favourite, then do your second favourite and so on. You’ll be surprised how much this little planning tip will keep your writing flowing easily.
Day 6 Round-Up:
- Put your contents headings into your order of preference
- Plan to write your favourite topic first to motivate you to get started!
Day 7: Create Separate Files For Your Headings
This is where Scrivener becomes your best friend. You can create separate files within one master document with different headings.
When you are planning out your book, create separate files named with your contents headings. This way, when you go to work on a section, you can go to the specific file and work on it individually, rather than scrolling through a long Word document.
You’ll also be able to switch about the order of your sections if you feel the flow isn’t quite right, since Scrivener has a great drag and drop feature.
There’s a psychology to this compartmentalised method, too. By having separate files that you work on individually, you’ll feel instantly more organised and prepared for the writing process.
You’ll also see your progress far more clearly. Whenever you finish a section, you can flag it as done so you know how far you have to go!
Here’s a screenshot of my folders for this blog post. You can see I’ve got each heading in its own file and work on each part separately.
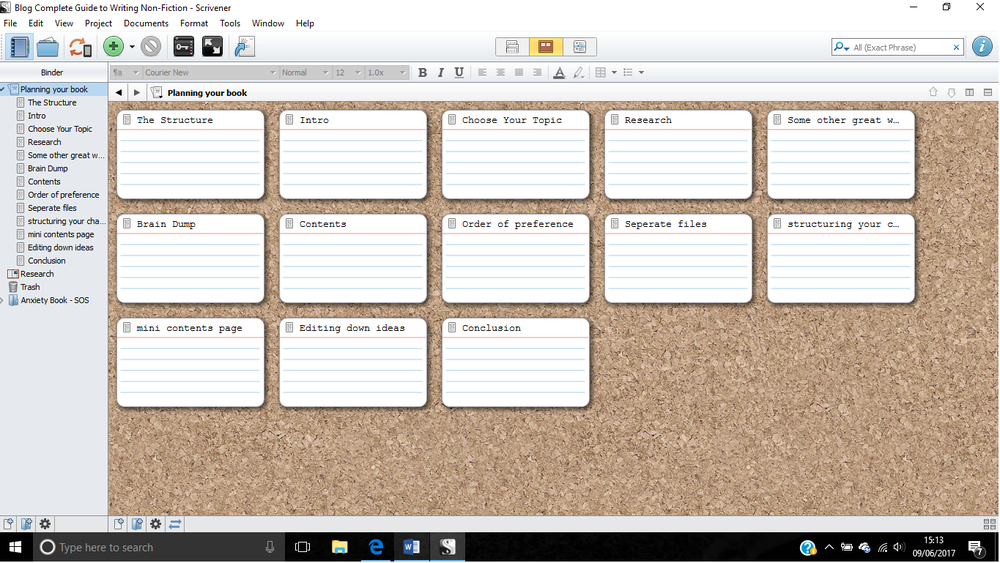
You can carry out this planning process in word, Google Docs, in a physical notepad, or chiselled into marble. Do whatever works best for you as a writer.
Day 7 Round-Up:
- Create a separate file for each of your content headings so you can work on each one separately.
Day 8: Organise Your Content
Next, it’s time to go back through your brain dump file (still loving that name) and move all of your ideas into your separate ‘heading’ files.
Figure out where all of your ideas best fit under these headings and copy and paste them into the appropriate files. This gives you a nice idea of what information you are going to add to each section.
This part of the plan will give you 'mini brain dumps' under each heading that you can work on later in the writing phase.
You’ll also see which chapters have enough content to build on, and which need more research or detail. Don’t worry about the information being tidy or structured yet, just get all of your information into the separate files.
Day 8 Round-Up:
- Organise all of your ideas and resources into your content files
- Keep it all separate and in a simple, coherent order
Day 9: Plan Your Sub-Headings
To plan out each chapter, you’re going to make a mini content page for each one. Look at your chapter and decide on subheadings to break up the information.
For example, if you are writing the book, “A beginners guide to ghost hunting” and you’ve got a chapter labelled “equipment”, you might want to break this chapter up with the headings of the different pieces of equipment you’ll use, like "EMP", "Night Vision Camera" and then you can write about each one.
I apologise now to any ghost hunting pros for my terrible knowledge of ghost hunting equipment.
These subheadings or 'mini contents pages' break each of your chapters down into even more manageable sections, so writing becomes extremely easy.
You can even plan on tackling one mini-section a day, which is minimal writing work but progresses your book along nicely.
Day 9 Round-Up:
- Go through your chapters and work out subheadings to add in
- Make sure these are relevant, helpful and flow well together within each chapter
At this point, give yourself a huge pat on the back! You’ve got a non-fiction book for a specific niche planned out and almost ready to write! Don’t you feel super motivated?
Day 10: Edit Down Your Plan and Research
The final stage in planning before you actually start the writing process, is editing down your ideas and researching any areas you need to.
Just because you have a million ideas doesn’t mean that you should include them all. You should edit down your plan to make sure the book you are writing is concise, useful and gives only the most valuable information.
You might have thought about adding in “planning for the queen to visit” for your book on “how to prepare your home for a big event”. The queen coming might be a bit far-fetched if you’re not Prince William, so you can edit this idea out.
Be ruthless here and go through all of your planning and cut out any ideas that you think are either too far from your core message and niche, or that you don't have enough experience or research to write about.
Remember, the more ideas and content you plan, the longer and more time-consuming the writing process will be. And you’ll find that the extra time and effort doesn’t always add value to your book.
Don’t throw these ideas away though, just take them out of the main plan and put them back in the brain dump. You never know what ideas might come in handy later on. Who knows when the queen is going to swing by for a visit?
At this point you may want to do some extra research. It's important to keep your book as close to your own experience and knowledge as you can, this will show your readers you are an expert in your niche.
But it's also important to have other research, case studies, and facts and figures that support your message. But remember that your book should be 80% your own experience and unique point of view.
Most writers will have most of this information at their fingertips. Especially since this is a book in a topic that you are extremely familiar and passionate about.
But if you have any extra research you want to include, now is the time to get it done.
Having everything you need prior to beginning the writing process will make getting it all down on paper a much smoother process. So save yourself future headaches and get as much as you possibly can prepared now!
Day 10 Round-Up:
- Edit down your work to your most valuable and useful ideas
- Do any extra research you need to strengthen your message
- Celebrate that you've finished planning your book!
Congrats! You're Done!
You now have a comprehensive plan and are prepared to write your book! I hope this post has given you the confidence and motivation to get your book planned and ready to write.
Planning your book out in this easy to follow way will save you so much time and effort during the writing process and it’s a blueprint you can use for all of your non-fiction books in the future.
Related Posts

Stay Connected


-
 Writing Tips for Adding Internal Conflict to Action Scenes
Internal Conflict in Action is like the secret ingredient...
- July 23, 2025
-
 How to Get More Writing Done in Less Time
Writing efficiency is something all writers strive for, but...
- July 23, 2025
-
 10 Writing Myths That Waste Your Time and Energy
Writing myths have a way of sneaking into our...
- July 23, 2025
-
Writing Tips for Adding Internal Conflict to Action Scenes
Internal Conflict in Action is like the secret ingredient...
- July 23, 2025
-
 Writing Prompt Basics: Tips for New Writers
"Share, Like or Tweet If You Love Writing" Even...
- January 31, 2015
-
 How to Avoid Common New Writer Mistakes
"Share, Like or Tweet If You Love Writing" So...
- January 31, 2015
-
 10 Mistakes New Fiction Writers Make
"Share, Like or Tweet If You Love Writing" For...
- January 31, 2015
-
 25 Things to Know About Self-Publishing Your Book
"Share, Like or Tweet If You Love Writing" A...
- January 31, 2015
-
 How To Self-Publish Your Book On Amazon
Not so long ago, the first hurdle for an...
- January 31, 2015
-
 10 Common Mistakes Writers Overlook
"Share, Like or Tweet If You Love Writing" Like...
- January 30, 2015
-
 10 Unbelievably Simple Ways to Write Your Book In 60 Days or Less! (What most publishing houses don’t want you to know)
"Share, Like or Tweet If You Love Writing" Whether...
- January 30, 2015
-
 5 Easy Steps for Writing a Book
"Share, Like or Tweet If You Love Writing" Writing...
- January 27, 2015
-
 101 Quick Actions You Can Take Today to Build the Writer Platform of Your Dreams
"Share, Like or Tweet If You Love Writing" 101...
- January 19, 2015